ELECTRICAL
REVIEW THE SCHEMATIC
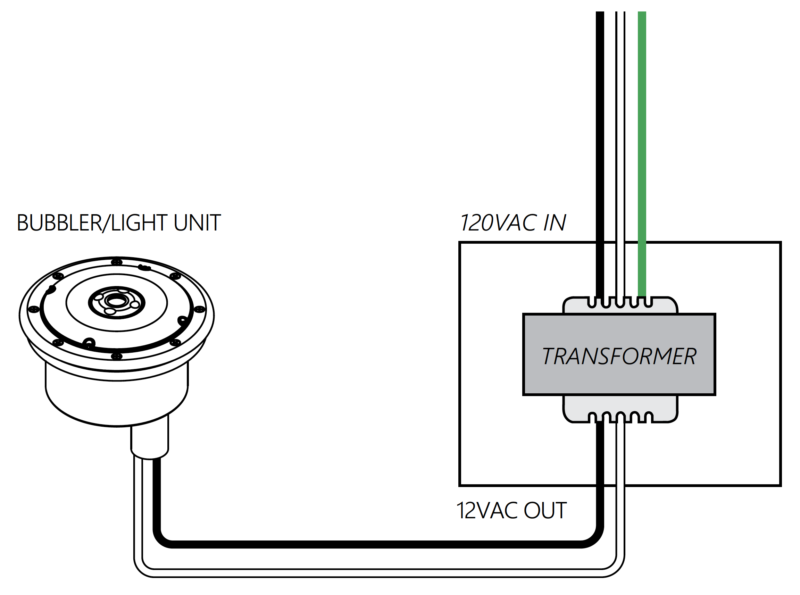
Refer to the schematic above for installing the electrical system.
NOTE: For warranty claims, the bubbler must have a complete cord intact. CUT ELECTRICAL CONNECTION CORDS WILL VOID WARRANTY.
12VAC TRANSFORMER
⚠️ 12VAC INPUT ONLY. Failure to use a 12VAC system will permanently damage the LED unit.
The 12VAC transformer is to be located in a waterproof enclosure. (transformer & enclosure not included)
The conduit from the bubbler should be connected to the transformer enclosure.
Pull the cable from the bubbler through the conduit to the transformer enclosure.
LEAVE SOME WIRE
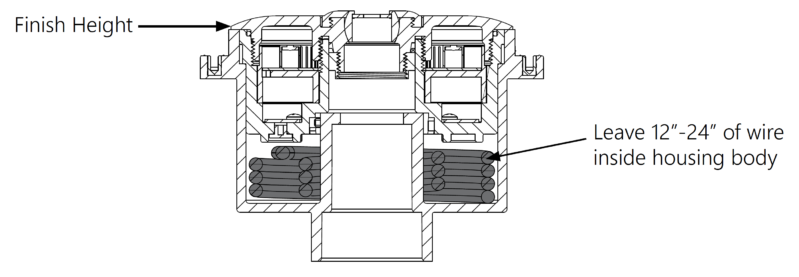
Leave about 12-24” of wire in the bubbler’s inner housing to allow for servicing of the LED module.
Then, pull the rest of the cable through to the transformer box.
WIND UP EXCESS WIRE
The bubbler unit can be mounted onto the hub by winding the excess cable around the inner hub inside the housing and lining up the LED module with the guide pins on the hub.
NOTE: For warranty claims, the bubbler must have a complete cord intact. CUT ELECTRICAL CONNECTION CORDS WILL VOID WARRANTY.
SECURE THE LIGHT
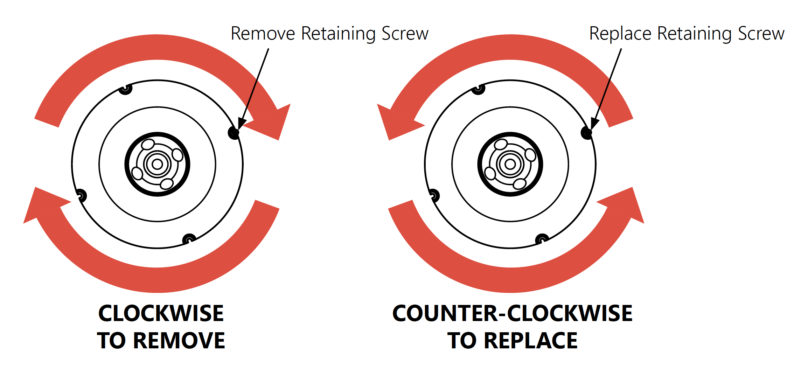
Secure the light by pushing the light downward onto the hub and twisting the light unit COUNTER-CLOCKWISE.
Then, secure the unit by replacing the LED Module Retaining Screw.
CONNECT THE WIRES
Connect the 120VAC switched input to the input side of the transformer as shown in the diagram.
Locate the power transformer output terminals and attach the two feed wires (one Black and one White) from the bubbler.
These black and white wires may be connected in any order to the output terminals on the transformer as they are not polarity dependent.
SWITCH TO OFF POSITION
Next, attach any grounded wire to the appropriate terminals and ensure all connections have been installed properly.
Make sure the switch is in the OFF position prior to startup.
Your LED Unit is now ready for operation.
NOTE: Never connect the unit to a dimmer switch. This can permanently damage the bubbler unit.
![]()
Congratulations!
You have completed this chapter. To go to the next chapter, click next. To go back to the Chapter Table of Contents, click done.